Come utilizzare l’alias e-mail @altervista.org con Google Mail (GMail) VERSIONE 2015

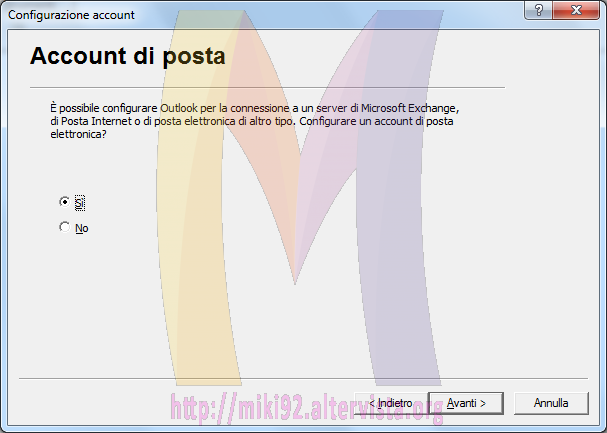
La seguente soluzione all’uso dell’alias con GMail mi è stata suggerita da Fabrizio P. webmaster di http://gommistadomiciliomilano.altervista.org/ il quale ha contribuito a questo sito con questa magnifico escamotage.

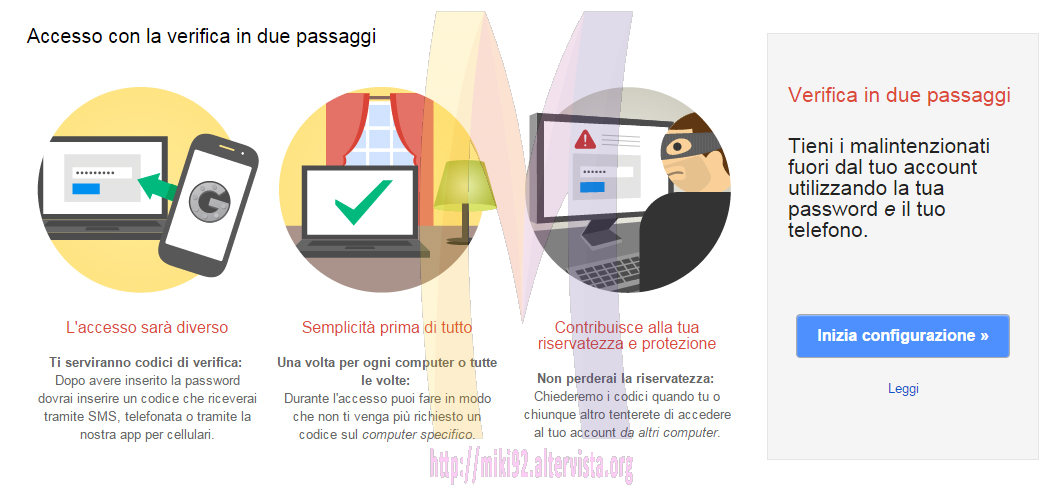
  1. Colleghiamoci alla Verifica in due passaggi di Google.
  2. Premere sul bottone azzurro “Inizia configurazione »“.
    gmail2015_1
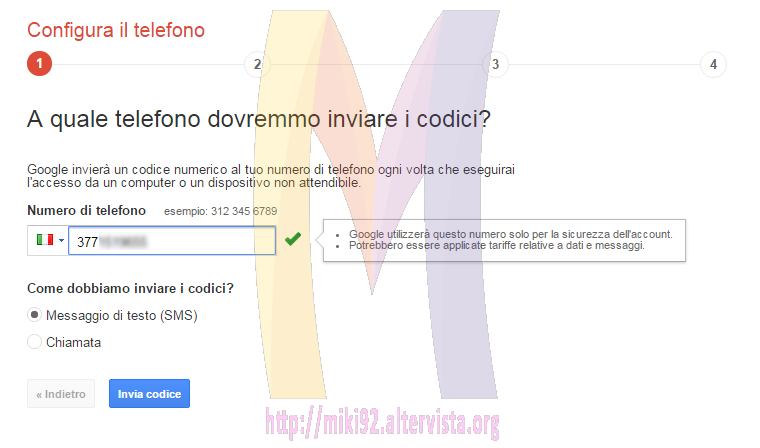
  3. Inserire nell’apposito campo un nostro numero di telefono (se ci troviamo all’estero ricordiamoci di cambiare il prefisso telefonico cliccando sull’icona della bandiera), scegliamo se desideriamo ricevere un SMS o una Chiamata e premiamo su Invia codice.
    gmail2015_2
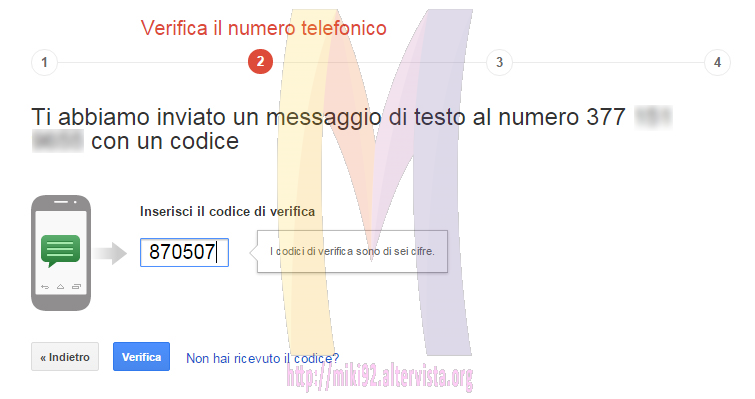
  4. Ricevuto il codice di 6 cifre inseriamolo nell’apposito campo e premiamo il bottone Verifica per proseguire.
    gmail2015_3
  5. Attenzione a questo passaggio: se ci troviamo su un pc che utilizziamo solo noi (o la nostra famiglia) proseguiamo altrimenti se si tratta di un pc pubblico o condiviso con più persone leviamo la spunta a “Questo computer è attendibile” ed andiamo Avanti ».
    gmail2015_4
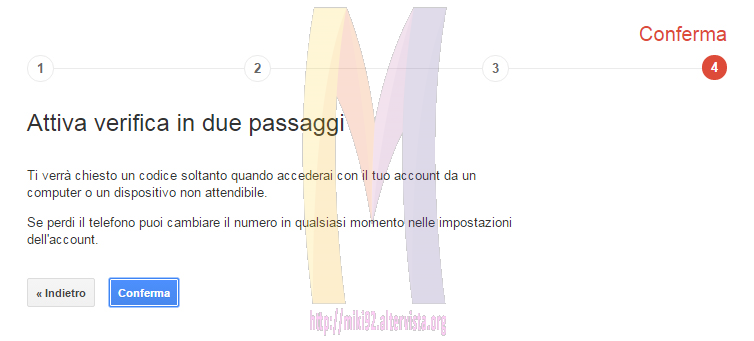
  6. Terminiamo la procedura guidata premendo il bottone Conferma.
    gmail2015_5
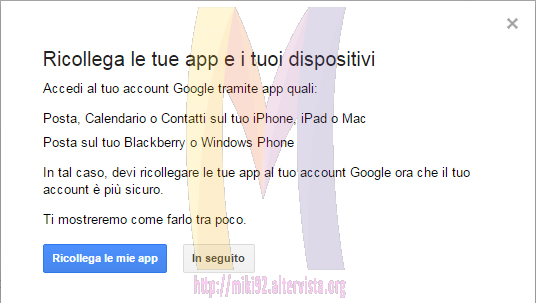
  7. Se compare il seguente pop-up premere In seguito.
    gmail2015_6
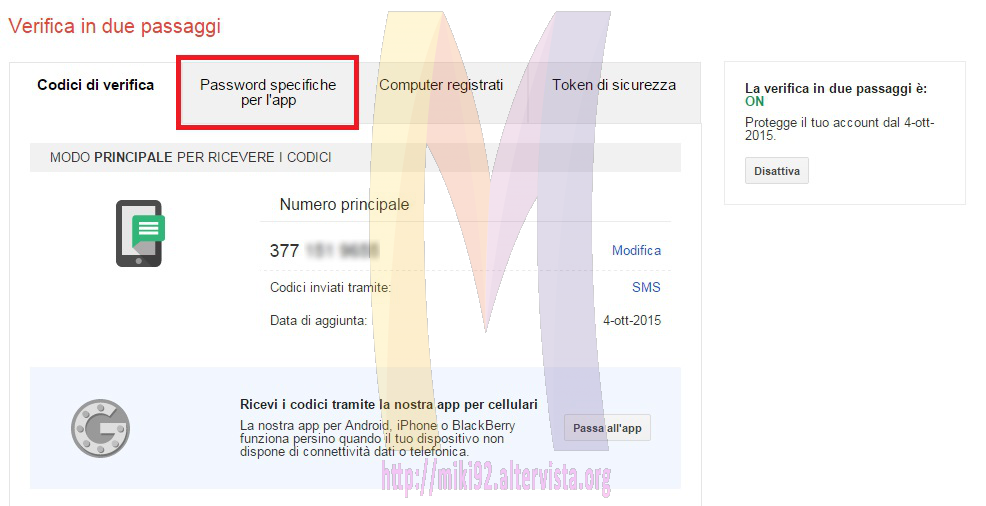
  8. in alto premere sul secondo tab: Password specifiche per l’app.
    gmail2015_7
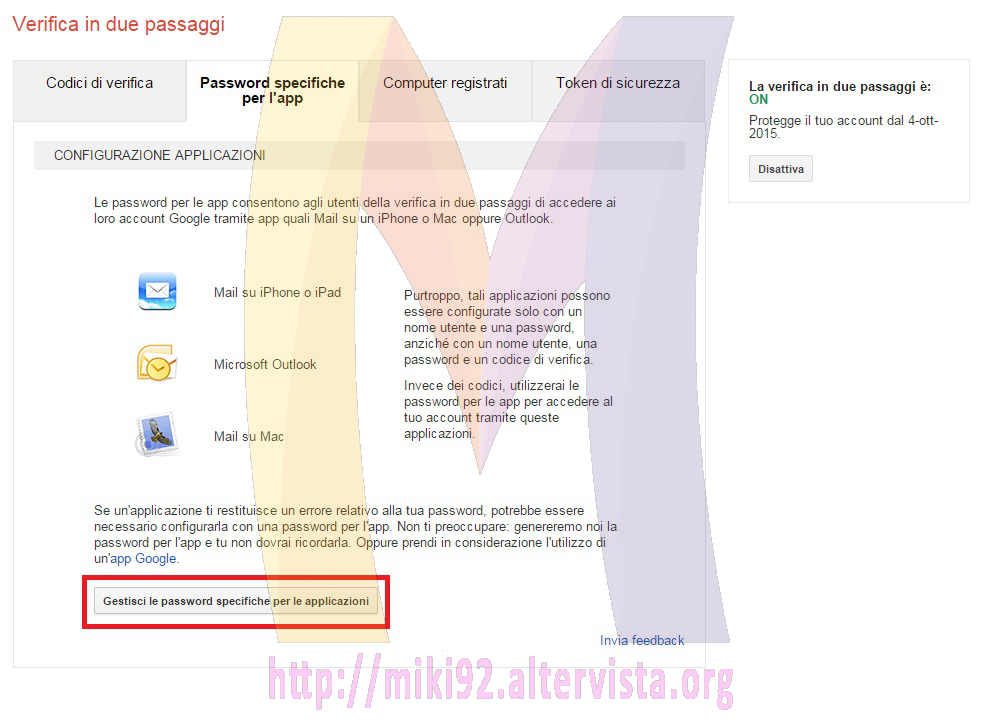
  9. Premere il pulsante Gestisci le password specifiche per le mie applicazioni.
    gmail2015_8
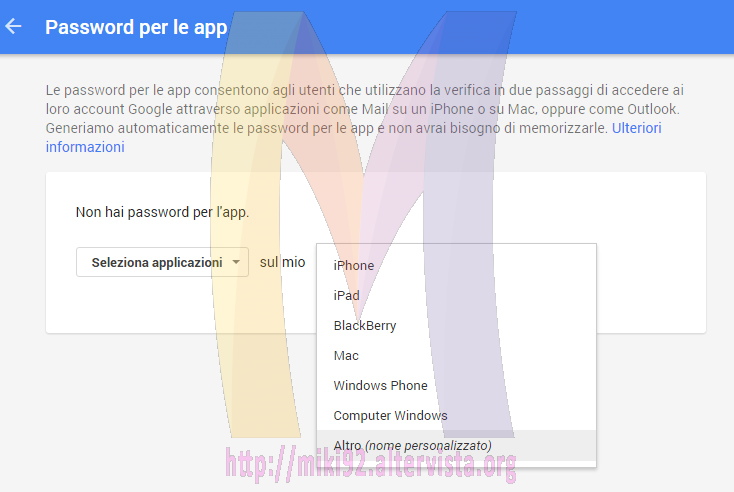
  10. Nel selectbox Seleziona applicazioni scegliamo Posta mentre nel selecbox Seleziona dispositivo scegliamo Altro (nome personalizzato).
    gmail2015_9 gmail2015_10
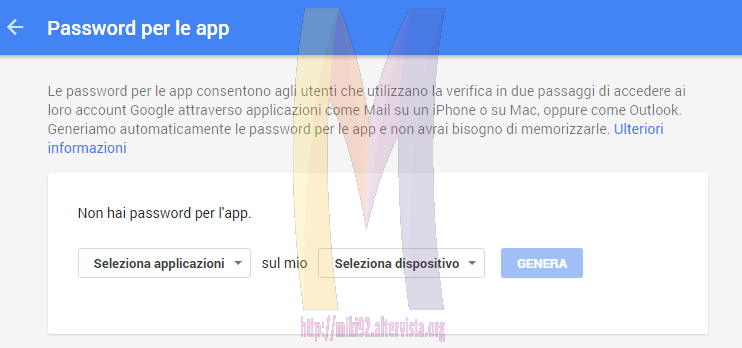
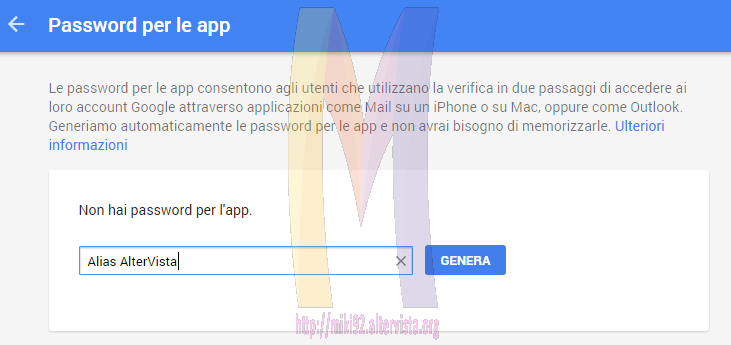
  11. Adesso scriviamo un nome per ricordaci il tipo di applicazione che stiamo creando (ad esempio “Alias AlterVista”) ed infine premiamo il bottone GENERA.
    gmail2015_11
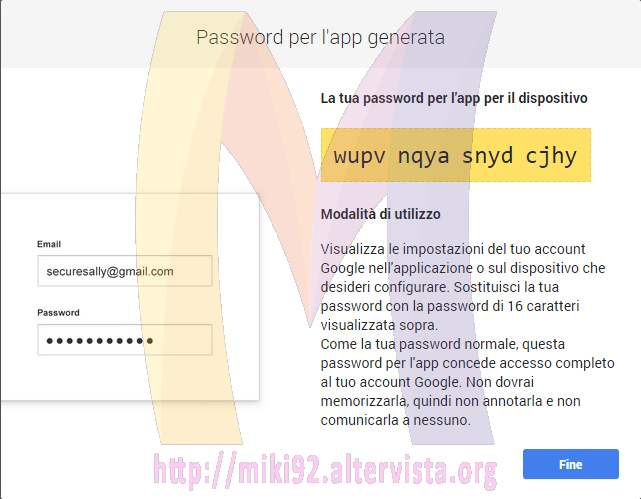
  12. A questo punto si aprirà un popup con una password generata in modo casuale. Copiamola e premiamo Fine.
    gmail2015_12
  13. Adesso non ci resta che impostare il vero e proprio alias. Come prima cosa accediamo a GMail.
  14. In alto a destra, cliccare sull’ingranaggio grigio presente sotto la foto di profilo e, successivamente, nel menù a tendina che si aprirà su Impostazioni.
    gmail2015_13
  15. Nel menù orizzontale scegliere il tab Account e importazione.
    gmail2015_14
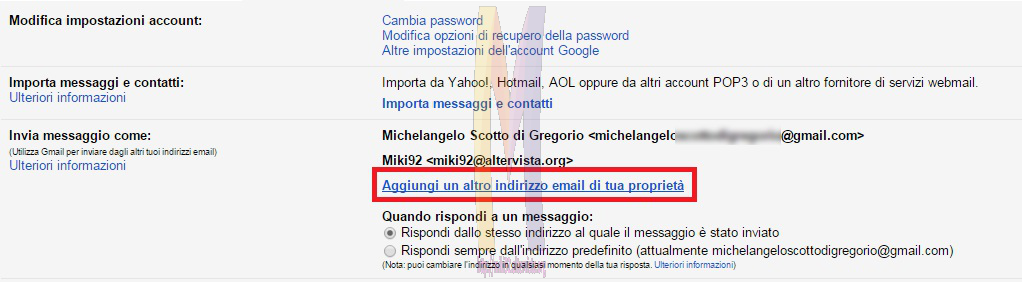
  16. Dalla sezione Invia messaggio come: scegliamo Aggiungi un altro indirizzo email di tua proprietà.
    gmail2015_15
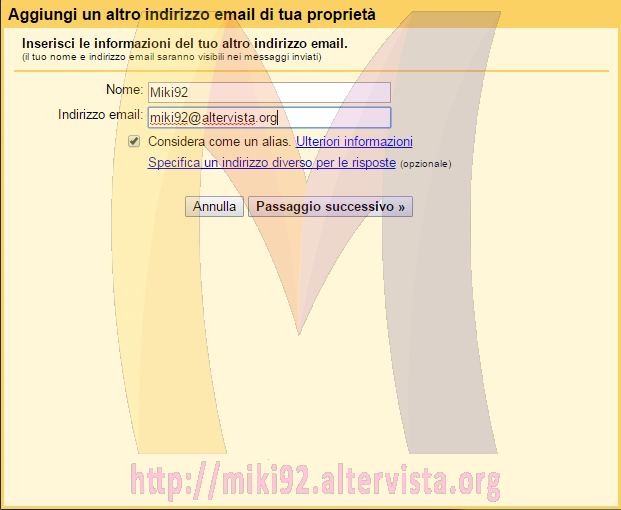
  17. Fatto ciò si aprirà una nuova finestra. Compiliamola con Nome il nostro nome o nickname ed Indirizzo email il nostro alias altervista, selezioniamo la spunta Considera come un alias e proseguiamo al Passaggio successivo ».
    gmail2015_16
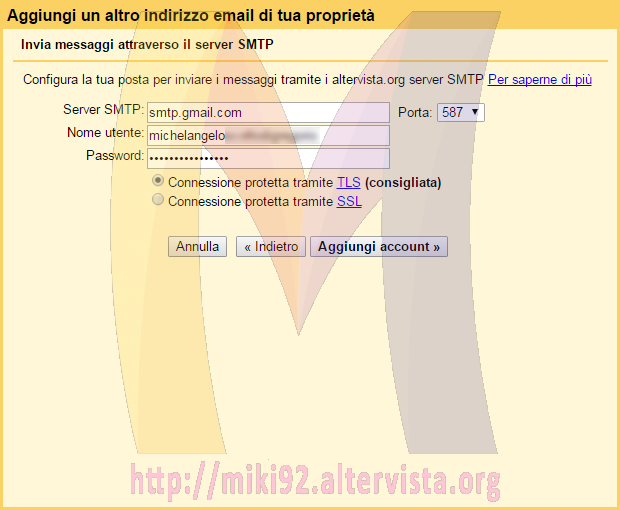
  18. ATTENZIONE a questo passaggio: compiliamo come segue:
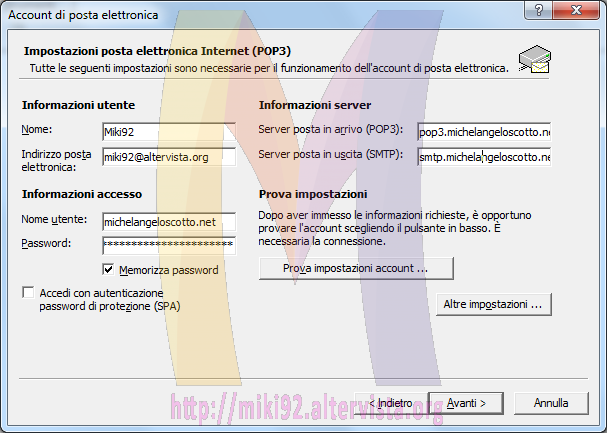
    • Server SMTP: smtp.gmail.com
    • Porta: 587
    • Nome utente: (il nostro nome utente gmail)
    • Password: (password generata in precedenza al passaggio 12)
    • Connessione protetta: TLS

    Configurato ciò clicchiamo su Aggiungi account ».
    gmail2015_17

  19. A questo punto abbiamo due alternative:
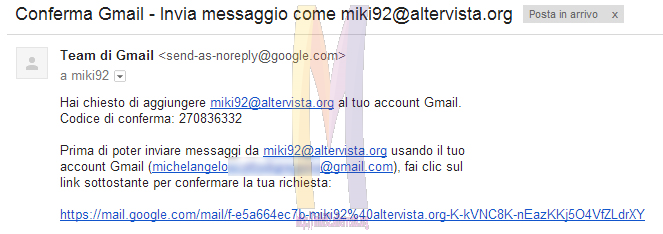
    1. Ridurre ad icona questa finestra, leggere dall’e-mail il codice di verifica, inserirlo nell’apposito spazio e cliccare su Verifica.
    2. Chiudere la finestra e proseguire con il prossimo passaggio.
      gmail2015_18
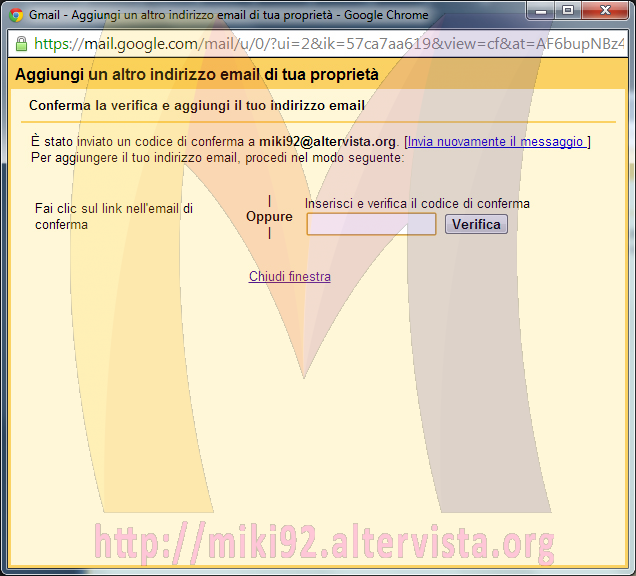
  20. Accedere alla Posta in Arrivo e confermare il link nell’e-mail di Google.
    gmail2015_19
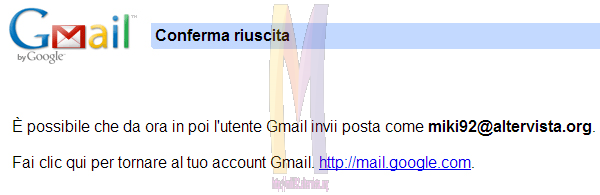
  21. Configurazione terminata.
    gmail2015_20
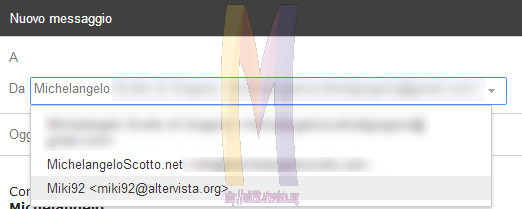
  22. Da questo momento in poi quando dovremmo spedire un e-mail tramite il nostro alias sarà sufficiente scegliere, al posto del nostro indirizzo e-mail principale, il nostro alias.
    gmail2015_21

Codice .htaccess (mod_rewrite) per Joomla 3.4.x

Codice ottimizzato per Joomla 3.4.x

RewriteEngine On
RewriteBase /

RewriteCond %{QUERY_STRING} base64_encode[^(]*\([^)]*\) [OR]
RewriteCond %{QUERY_STRING} (<|%3C)([^s]*s)+cript.*(>|%3E) [NC,OR]
RewriteCond %{QUERY_STRING} GLOBALS(=|\[|\%[0-9A-Z]{0,2}) [OR]
RewriteCond %{QUERY_STRING} _REQUEST(=|\[|\%[0-9A-Z]{0,2})
RewriteRule .* index.php [F]

RewriteCond %{REQUEST_URI} !^/index\.php
RewriteCond %{REQUEST_URI} /component/|(/[^.]*|\.(php|html?|feed|pdf|vcf|raw))$ [NC]
RewriteCond %{REQUEST_FILENAME} !-f
RewriteCond %{REQUEST_FILENAME} !-d
RewriteRule .* index.php [L]

Codice originale per Joomla 3.4.x

##
# @package    Joomla
# @copyright  Copyright (C) 2005 - 2015 Open Source Matters. All rights reserved.
# @license    GNU General Public License version 2 or later; see LICENSE.txt
##

##
# READ THIS COMPLETELY IF YOU CHOOSE TO USE THIS FILE!
#
# The line just below this section: 'Options +FollowSymLinks' may cause problems
# with some server configurations.  It is required for use of mod_rewrite, but may already
# be set by your server administrator in a way that disallows changing it in
# your .htaccess file.  If using it causes your server to error out, comment it out (add # to
# beginning of line), reload your site in your browser and test your sef url's.  If they work,
# it has been set by your server administrator and you do not need it set here.
##

## No directory listings
IndexIgnore *

## Can be commented out if causes errors, see notes above.
Options +FollowSymlinks
Options -Indexes

## Mod_rewrite in use.

RewriteEngine On

## Begin - Rewrite rules to block out some common exploits.
# If you experience problems on your site block out the operations listed below
# This attempts to block the most common type of exploit `attempts` to Joomla!
#
# Block out any script trying to base64_encode data within the URL.
RewriteCond %{QUERY_STRING} base64_encode[^(]*\([^)]*\) [OR]
# Block out any script that includes a <script> tag in URL.
RewriteCond %{QUERY_STRING} (<|%3C)([^s]*s)+cript.*(>|%3E) [NC,OR]
# Block out any script trying to set a PHP GLOBALS variable via URL.
RewriteCond %{QUERY_STRING} GLOBALS(=|\[|\%[0-9A-Z]{0,2}) [OR]
# Block out any script trying to modify a _REQUEST variable via URL.
RewriteCond %{QUERY_STRING} _REQUEST(=|\[|\%[0-9A-Z]{0,2})
# Return 403 Forbidden header and show the content of the root homepage
RewriteRule .* index.php [F]
#
## End - Rewrite rules to block out some common exploits.

## Begin - Custom redirects
#
# If you need to redirect some pages, or set a canonical non-www to
# www redirect (or vice versa), place that code here. Ensure those
# redirects use the correct RewriteRule syntax and the [R=301,L] flags.
#
## End - Custom redirects

##
# Uncomment following line if your webserver's URL
# is not directly related to physical file paths.
# Update Your Joomla! Directory (just / for root).
##

# RewriteBase /

## Begin - Joomla! core SEF Section.
#
RewriteRule .* - [E=HTTP_AUTHORIZATION:%{HTTP:Authorization}]
#
# If the requested path and file is not /index.php and the request
# has not already been internally rewritten to the index.php script
RewriteCond %{REQUEST_URI} !^/index\.php
# and the requested path and file doesn't directly match a physical file
RewriteCond %{REQUEST_FILENAME} !-f
# and the requested path and file doesn't directly match a physical folder
RewriteCond %{REQUEST_FILENAME} !-d
# internally rewrite the request to the index.php script
RewriteRule .* index.php [L]
#
## End - Joomla! core SEF Section.

Codice .htaccess (mod_rewrite) per Joomla 3.3.x

Codice ottimizzato per Joomla 3.3.x

RewriteEngine On
RewriteBase /

RewriteCond %{QUERY_STRING} base64_encode[^(]*\([^)]*\) [OR]
RewriteCond %{QUERY_STRING} (<|%3C)([^s]*s)+cript.*(>|%3E) [NC,OR]
RewriteCond %{QUERY_STRING} GLOBALS(=|\[|\%[0-9A-Z]{0,2}) [OR]
RewriteCond %{QUERY_STRING} _REQUEST(=|\[|\%[0-9A-Z]{0,2})
RewriteRule .* index.php [F]

RewriteCond %{REQUEST_URI} !^/index\.php
RewriteCond %{REQUEST_URI} /component/|(/[^.]*|\.(php|html?|feed|pdf|vcf|raw))$ [NC]
RewriteCond %{REQUEST_FILENAME} !-f
RewriteCond %{REQUEST_FILENAME} !-d
RewriteRule .* index.php [L]

Codice originale per Joomla 3.3.x

##
# @package    Joomla
# @copyright  Copyright (C) 2005 - 2014 Open Source Matters. All rights reserved.
# @license    GNU General Public License version 2 or later; see LICENSE.txt
##

##
# READ THIS COMPLETELY IF YOU CHOOSE TO USE THIS FILE!
#
# The line just below this section: 'Options +FollowSymLinks' may cause problems
# with some server configurations.  It is required for use of mod_rewrite, but may already
# be set by your server administrator in a way that dissallows changing it in
# your .htaccess file.  If using it causes your server to error out, comment it out (add # to
# beginning of line), reload your site in your browser and test your sef url's.  If they work,
# it has been set by your server administrator and you do not need it set here.
##

## Can be commented out if causes errors, see notes above.
Options +FollowSymLinks

## Mod_rewrite in use.

RewriteEngine On

## Begin - Rewrite rules to block out some common exploits.
# If you experience problems on your site block out the operations listed below
# This attempts to block the most common type of exploit `attempts` to Joomla!
#
# Block out any script trying to base64_encode data within the URL.
RewriteCond %{QUERY_STRING} base64_encode[^(]*\([^)]*\) [OR]
# Block out any script that includes a <script> tag in URL.
RewriteCond %{QUERY_STRING} (<|%3C)([^s]*s)+cript.*(>|%3E) [NC,OR]
# Block out any script trying to set a PHP GLOBALS variable via URL.
RewriteCond %{QUERY_STRING} GLOBALS(=|\[|\%[0-9A-Z]{0,2}) [OR]
# Block out any script trying to modify a _REQUEST variable via URL.
RewriteCond %{QUERY_STRING} _REQUEST(=|\[|\%[0-9A-Z]{0,2})
# Return 403 Forbidden header and show the content of the root homepage
RewriteRule .* index.php [F]
#
## End - Rewrite rules to block out some common exploits.

## Begin - Custom redirects
#
# If you need to redirect some pages, or set a canonical non-www to
# www redirect (or vice versa), place that code here. Ensure those
# redirects use the correct RewriteRule syntax and the [R=301,L] flags.
#
## End - Custom redirects

##
# Uncomment following line if your webserver's URL
# is not directly related to physical file paths.
# Update Your Joomla! Directory (just / for root).
##

# RewriteBase /

## Begin - Joomla! core SEF Section.
#
RewriteRule .* - [E=HTTP_AUTHORIZATION:%{HTTP:Authorization}]
#
# If the requested path and file is not /index.php and the request
# has not already been internally rewritten to the index.php script
RewriteCond %{REQUEST_URI} !^/index\.php
# and the requested path and file doesn't directly match a physical file
RewriteCond %{REQUEST_FILENAME} !-f
# and the requested path and file doesn't directly match a physical folder
RewriteCond %{REQUEST_FILENAME} !-d
# internally rewrite the request to the index.php script
RewriteRule .* index.php [L]
#
## End - Joomla! core SEF Section.

Codice .htaccess (mod_rewrite) per Joomla 3.2.x

Codice ottimizzato per Joomla 3.2.x

RewriteEngine On
RewriteBase /

RewriteCond %{QUERY_STRING} base64_encode[^(]*\([^)]*\) [OR]
RewriteCond %{QUERY_STRING} (<|%3C)([^s]*s)+cript.*(>|%3E) [NC,OR]
RewriteCond %{QUERY_STRING} GLOBALS(=|\[|\%[0-9A-Z]{0,2}) [OR]
RewriteCond %{QUERY_STRING} _REQUEST(=|\[|\%[0-9A-Z]{0,2})
RewriteRule .* index.php [F]

RewriteCond %{REQUEST_URI} !^/index\.php
RewriteCond %{REQUEST_URI} /component/|(/[^.]*|\.(php|html?|feed|pdf|vcf|raw))$ [NC]
RewriteCond %{REQUEST_FILENAME} !-f
RewriteCond %{REQUEST_FILENAME} !-d
RewriteRule .* index.php [L]

Codice originale per Joomla 3.2.x

##
# @package    Joomla
# @copyright  Copyright (C) 2005 - 2014 Open Source Matters. All rights reserved.
# @license    GNU General Public License version 2 or later; see LICENSE.txt
##

##
# READ THIS COMPLETELY IF YOU CHOOSE TO USE THIS FILE!
#
# The line just below this section: 'Options +FollowSymLinks' may cause problems
# with some server configurations.  It is required for use of mod_rewrite, but may already
# be set by your server administrator in a way that dissallows changing it in
# your .htaccess file.  If using it causes your server to error out, comment it out (add # to
# beginning of line), reload your site in your browser and test your sef url's.  If they work,
# it has been set by your server administrator and you do not need it set here.
##

## Can be commented out if causes errors, see notes above.
Options +FollowSymLinks

## Mod_rewrite in use.

RewriteEngine On

## Begin - Rewrite rules to block out some common exploits.
# If you experience problems on your site block out the operations listed below
# This attempts to block the most common type of exploit `attempts` to Joomla!
#
# Block out any script trying to base64_encode data within the URL.
RewriteCond %{QUERY_STRING} base64_encode[^(]*\([^)]*\) [OR]
# Block out any script that includes a <script> tag in URL.
RewriteCond %{QUERY_STRING} (<|%3C)([^s]*s)+cript.*(>|%3E) [NC,OR]
# Block out any script trying to set a PHP GLOBALS variable via URL.
RewriteCond %{QUERY_STRING} GLOBALS(=|\[|\%[0-9A-Z]{0,2}) [OR]
# Block out any script trying to modify a _REQUEST variable via URL.
RewriteCond %{QUERY_STRING} _REQUEST(=|\[|\%[0-9A-Z]{0,2})
# Return 403 Forbidden header and show the content of the root homepage
RewriteRule .* index.php [F]
#
## End - Rewrite rules to block out some common exploits.

## Begin - Custom redirects
#
# If you need to redirect some pages, or set a canonical non-www to
# www redirect (or vice versa), place that code here. Ensure those
# redirects use the correct RewriteRule syntax and the [R=301,L] flags.
#
## End - Custom redirects

##
# Uncomment following line if your webserver's URL
# is not directly related to physical file paths.
# Update Your Joomla! Directory (just / for root).
##

# RewriteBase /

## Begin - Joomla! core SEF Section.
#
RewriteRule .* - [E=HTTP_AUTHORIZATION:%{HTTP:Authorization}]
#
# If the requested path and file is not /index.php and the request
# has not already been internally rewritten to the index.php script
RewriteCond %{REQUEST_URI} !^/index\.php
# and the request is for something within the component folder,
# or for the site root, or for an extensionless URL, or the
# requested URL ends with one of the listed extensions
RewriteCond %{REQUEST_URI} /component/|(/[^.]*|\.(php|html?|feed|pdf|vcf|raw))$ [NC]
# and the requested path and file doesn't directly match a physical file
RewriteCond %{REQUEST_FILENAME} !-f
# and the requested path and file doesn't directly match a physical folder
RewriteCond %{REQUEST_FILENAME} !-d
# internally rewrite the request to the index.php script
RewriteRule .* index.php [L]
#
## End - Joomla! core SEF Section.

Come utilizzare l’alias e-mail @altervista.org con Microsoft Outlook Express 6

outlookexpress6_1

  1. Come prima cosa andiamo nella barra degli strumenti posta in alto nel software e clicchiamo prima su Strumenti e successivamente su Account… outlookexpress6_2
  2. Nella nuova finestra clicchiamo prima sulla scheda Posta elettronica poi sul pulsante Aggiunti ed infine sulla voce Posta Elettronica…
    outlookexpress6_3
  3. Fatto ciò si aprirà una nuova finestra, la quale ci chiederà il nostro nome, a questo punto al posto del campo Nome dobbiamo inserire il nostro alias @altervista.org; quando pronti andiamo Avanti.
    outlookexpress6_4
  4. Ora ci verrà richiesto il nostro indirizzo e-mail reale, inseriamolo e andiamo Avanti.
    outlookexpress6_5
  5. Nella terzultima finestra ci saranno richiesti i parametri di accesso al nostro server, solitamente Il server della posta in arrivo è POP3.
    Tra i vari parametri è possibile scegliere HTTP il quale si utilizzava per connettersi alla posta di Messenger. Dato che Microsoft Outlook Express 6 è po’ vecchio si consiglia di non selezionare questo parametro in quanto le impostazioni potrebbero essere diverse da quelle attuali.
    Eventualmente si possegga un indirizzo e-mail Messenger è consigliato utilizzare software più aggiornati come Windows Live Mail.

    outlookexpress6_6
  6. Nella penultima schermata dobbiamo inserire il nostro indirizzo e-mail e la nostra password ed infine andare Avanti.
    outlookexpress6_7
  7. E’ ora terminata la procedura per impostare l’alias @altervista.org con Microsoft Outlook Express 6.
    outlookexpress6_8

Come pubblicare un sito web su internet tramite WebSite X5

Nella seguente guida sarà utilizzata la versione 8 del programma. Le versioni superiori potrebbero subire qualche leggera modifica.

  1. Essendo questa una guida su come pubblicare un sito con WebSite X5 partiremo per l’appunto dal passaggio 5: l’Esportazione saltando la creazione di un sito web e relative informazioni.
    In questo passaggio scegliamo la prima opzione ovvero “Esporta il sito su Internet” ed andare Avanti.
    websitex5_1
  2. In questo secondo passaggio di esportazione dobbiamo inserire i nostri dati FTP forniti dal nostro hosting.  Di seguito i dati per AlterVista.org:
    • Indirizzo: ftp.tuousername.altervista.org
    • Username: tuousername
    • Password: latuapassword
    • Porta: 21
    • Utilizza FTP passivo: si
      Nella seguente immagine è stata utilizzato, erroneamente, il vecchio host miki92.altervista.org al posto di quello attuale ftp.miki92.altervista.org.
      websitex5_2
  3. Quando il programma effettuerà la connessione al nostro sito web ci chiederà se siamo sicuri di voler pubblicare i files nella directory da noi scelti online quindi noi premiamo il bottone OK per dare conferma.
    websitex5_3
  4. La prossima schermata indica il progresso di pubblicazione del sito internet.
    websitex5_4
  5. Quando l’esportazione sarà terminata ci comparirà un messaggio di conferma come quello di seguito.
    websitex5_5

Come utilizzare l’alias e-mail @altervista.org con Microsoft Outlook 2007

  1. Aprire Microsoft Outlook 2007.
  2. Se compare la finestra contenente la procedura guidata, cliccare sul bottone “Annulla“.
    outlook2007_1
  3. In alto, nella barra degli strumenti, cliccare su “Strumenti” e successivamente su “Impostazioni account…“.
    outlook2007_2
  4. Nella nuova finestra cliccare sul bottone “Nuovo…“.
    outlook2007_3
  5. Nella nuova finestra selezionare la voce “Configura manualmente le impostazioni del server o tipi di server aggiuntivi” e poi cliccare sul bottone “Avanti >“.
    outlook2007_4
  6. Lasciare selezionato Posta elettronica Internet ed andare “Avanti >“.
    outlook2007_5
  7. Questo è il punto fondamentale della nostra guida. In questa finestra andranno inseriti i vari parametri per la configurazione del nostro account e-mail. Tali parametri ci vengono assegnati dal nostro provider al termine della registrazione di un indirizzo e-mail o, alternativamente, possiamo recuperarli cercando su internet.
    Per quanto riguarda le voci “Nome” e “Indirizzo posta elettronica” possiamo utilizzare il nostro nick ed il nostro alias o, se preferiamo, solamente il nostro alias; mentre per quanto riguarda gli altri parametri vanno tutti quanti inseriti correttamente utilizzando i dati del nostro provider e-mail.
    Al termine della procedura premere sul bottone “Avanti >” e poi su “Fine“.
    outlook2007_6outlook2007_7

Come utilizzare l’alias e-mail @altervista.org con Microsoft Office Outlook 2003

  1. Aprire Microsoft Office Outlook 2003.
  2. Se compare la finestra contenente la procedura guidata, cliccare sul bottone “Annulla“.
    outlook2003_1
  3. In alto, nella barra degli strumenti, cliccare su “Strumenti” e successivamente su “Account di posta elettronica…“.
    outlook2003_2
  4. Nella nuova finestra lasciare selezionata la prima opzione e poi procediamo al prossimo passaggio cliccando sul bottone “Avanti >“.outlook2003_3
  5. A questo punto bisogna scegliere che tipo di account si deve configurare. Molti provider offrono sia POP3 che IMAP. Se possibile scegliere IMAP altrimenti POP3.
    Quando scelta l’opzione più adatta alle proprie esigenze premere sul bottone “Avanti >“.
    outlook2003_4
  6. Questo è il punto fondamentale della nostra guida. In questa finestra andranno inseriti i vari parametri per la configurazione del nostro account e-mail. Tali parametri ci vengono assegnati dal nostro provider al termine della registrazione di un indirizzo e-mail o, alternativamente, possiamo recuperarli cercando su internet.
    Per quanto riguarda le voci “Nome” e “Indirizzo posta elettronica” possiamo utilizzare il nostro nick ed il nostro alias o, se preferiamo, solamente il nostro alias; mentre per quanto riguarda gli altri parametri vanno tutti quanti inseriti correttamente utilizzando i dati del nostro provider e-mail.
    Al termine della procedura premere sul bottone “Avanti >” e poi su “Fine“.
    outlook2003_5outlook2003_6

Come utilizzare l’alias e-mail @altervista.org con Microsoft Outlook 2000 e 2002

  1. Aprire Microsoft Outlook 2000 o 20002.
  2. Se compare la finestra contenente la procedura guidata, cliccare sul bottone “Annulla“.
    outlook2000_1
  3. In alto, nella barra degli strumenti, cliccare su “Strumenti” e successivamente su “Account di posta elettronica…“.
    outlook2000_2
  4. Nella nuova finestra lasciare selezionata la prima opzione e poi procediamo al prossimo passaggio cliccando sul bottone “Avanti >“.
    outlook2000_3
  5. Lasciare l’opzione selezionata (ovvero “Si“) e procediamo cliccando sul bottone “Avanti >“.
    outlook2000_4
  6. A questo punto bisogna scegliere che tipo di account si deve configurare. Molti provider offrono sia POP3 che IMAP. Se possibile scegliere IMAP altrimenti POP3.
    Quando scelta l’opzione più adatta alle proprie esigenze premere sul bottone “Avanti >“.
    outlook2000_5
  7. Questo è il punto fondamentale della nostra guida. In questa finestra andranno inseriti i vari parametri per la configurazione del nostro account e-mail. Tali parametri ci vengono assegnati dal nostro provider al termine della registrazione di un indirizzo e-mail o, alternativamente, possiamo recuperarli cercando su internet.
    Per quanto riguarda le voci “Nome” e “Indirizzo posta elettronica” possiamo utilizzare il nostro nick ed il nostro alias o, se preferiamo, solamente il nostro alias; mentre per quanto riguarda gli altri parametri vanno tutti quanti inseriti correttamente utilizzando i dati del nostro provider e-mail.
    Al termine della procedura premere sul bottone “Avanti >” e poi su “Fine“.
    outlook2000_6

Come utilizzare l’alias e-mail @altervista.org con Windows Mail

  1. Aprire Windows Mail.
  2. Se compare la finestra contenente la procedura guidata, cliccare sul bottone “Annulla” o eventualmente passare al punto #6 di questa guida.
    winmail_1
  3. In alto a destra, nella barra dei menù, cliccare su Strumenti e poi su Account…
    winmail_2
  4. Dalla nuova finestra cliccare sul bottone Aggiungi presente in alto a sinistra.
    winmail_3
  5. Scegliere Account di posta elettronica.
    winmail_4
  6. Nel seguente campo inserire il nostro nick altervista o, se preferiamo, il nostro alias.
    winmail_5
  7. In questo passaggio è necessario inserire il nostro alias @altervista.org anche nel caso in cui sia stato inserito anche nel precedente passaggio.
    winmail_6
  8. A questo punto bisogna scegliere che tipo di account si deve configurare. Molti provider offrono sia POP3 che IMAP. Se possibile scegliere IMAP altrimenti POP3.
    Quando scelta l’opzione più adatta alle proprie esigenze premere sul bottone “Avanti“.
    winmail_7
  9. Questo è il punto fondamentale della nostra guida. In questa finestra andranno inseriti i vari parametri per la configurazione del nostro account e-mail. Tali parametri ci vengono assegnati dal nostro provider al termine della registrazione di un indirizzo e-mail o, alternativamente, possiamo recuperarli cercando su internet.
    winmail_8winmail_9